10 Composition Tips for Better Photos

You cook a wonderful meal and your friends say: “WOW! That was GREAT! Delicious! What kind of OVEN did you use? You must have a great OVEN!”
You would be miffed, right? Because you know it’s not the oven, it’s the COOK who prepares a great meal. Great soufflés were prepared by Julia Childs, not by her pots and pans. And the same is true in photography: it’s not the camera, it’s the photographer who makes the image. We firmly believe you can take a good or bad picture with ANY camera!
Photography, like painting, is all about composition: the symmetry, the balance, the leading lines, the framing, the perspective, the points of interest in the image that draw the viewer’s eye.
Here are some tips on bringing good composition into your pictures. For a more in-depth study, join us for our special Zoom session on April 18th at 4 pm entitled, “It’s The Composition, Stupid!” in which we examine famous paintings with the help of expert art historian Dr. Hollis Clayson.
1. Determine the SUBJECT and PURPOSE of your Photograph! Why are you taking the picture? Who is it for? What are you trying to show? Say to yourself: “The reason I am taking this picture is….,”
2. Fill Your Frame and Keep It Simple: Once you have determined your subject, get CLOSE to it and fill the frame, leaving out what is not important.
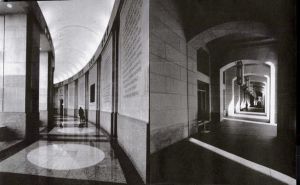
3. Frame Your Subject: Elements like tree branches, windows, doors, archways enclose your subject and make it stand out.

4. Place a Person or Object In the Right or Left Foreground of your Image: This will give a three-dimensional quality to an otherwise flat two-dimensional picture. This is especially important for wide-angle landscape and cityscape photos
5. Avoid Placing Your Subject Right In The Middle of Your Photo: That is called the bulls-eye look and it is not artistic. Place your subject in the left third, right third, bottom third or top third of your photo, a technique known as Rule of Thirds.
6. Try To Get Leading Lines Into Your Photo: Your image becomes more interesting when the viewer’s eye is drawn into lines that pull the viewer on angles from right to left, left to right, bottom to top, or top to bottom. This can be done with roadways, fences, hilltops, railings, paths, railroad tracks, theater aisles, etc.
7. Blur the Background: Your subject in the foreground will stand out much better if you keep the background blurred by using a large aperture, such as F3.5 , F 2.8, or F1.8 on a lens with a focal length of 85mm or higher. The same effect can also be achieved with a “Nifty Fifty” 50mm lens set at F 1.8 or F 1.4 and getting close to your subject,. This is especially good for portraits and animal or object close-ups.
8. Sharpen The Background: For landscapes, cityscapes, seascapes, or room interiors you will want even sharpness from the front of the image to the back. This is done with small apertures like F 11, F16, F 22, or F 36, especially on wide angle lenses like 18mm, 14mm, 12mm or 10 mm. Remember this: “at F 2 you get 2 people in focus, at F22 you get 22 people in focus.”
9. Freeze the Action, Blur The Action, Eliminate The Action: This is done by manipulating your shutter speed. 1/500th of a second or higher stops movement, ½ second or slower blurs movement, one, two, or three seconds or longer can make moving people and cars disappear completely (using tripod + neutral density filters)
10. Don’t Be Afraid To Break The Rules: Once you know the rules, break them to make your images even more interesting!